Wednesday, December 26, 2012

Barely Beating the Buzzer!!!

It happens every year, as regular as ,say, Christmas.  Gifts are completed at the buzzer. the last to be loaded into the car for the trip to wherever.  Some packages just have no hope of getting mailed in time- thankfully those on the receiving end are thrilled to get them whenever.  You see , they KNOW me, perhaps they don't quite understand me, but they KNOW me!!  ( And I LOVE them for it!!!)  ( Click on each picture to enlarge)


This year the Best Buzzer Beater was this scarf that I knit for my Mother in Law.  The yarn is called Monarch, it is made in Italy.  It comes in glorious colorways and looks really special when finished.
 The gal at the wonderful new yarn shop in Fredericksburg assured me it would only take a couple of hours.  Other scarves of this type had  been a snap,so what could go wrong????  WELL, I was confident till I unwrapped the yarn and saw that all of the wonderful texture and color came from a mass of thin and sticky filaments of fiber that had to be sorted through in order to find the stitch!!! ARGH!!!!!  I quickly had to abandon the metal #5 needles and go out to purchase a set of bamboo needles as the yarn , once stitches were located, insisted on sliding off the metal needles.  Cursing, swearing, throwing of yarn ensued, even the dogs decided that they could find quieter spots to snooze. The 40% off coupon at least cured the sliding stitches bit and the shop had #5's in stock, miracle that!!  We were due to travel north to gather for Christmas Eve with Tom's family at 3 pm.  That was the hour that I determined the baking would be done, I would be ready and gifts would be wrapped tagged and bagged.  The last stitch was taken on the scarf at 2:45.  The wrapping was accomplished with a gift bag- boy do I love gift bags!! I only wish that I could get to a point where I could have the time to make my own gift bags,  Perhaps next year, or not!!!

 I did a bit of Christmas shopping in my studio and took care of the rest of the in laws in that fashion. Very satisfying to pass on some wonderful hand crafted items that had not been purchased yet!  For my college sophomore niece Sarah, I had started a journal project.  This project came in a close second to the Buzzer Beating scarf.  As the cookies for dessert were baking, I was finishing up the binding and binding embellishments on Sarah's journal.  I am not really sure if Sarah is one who might journal but if she had a neat hand made book, made with her in mind, perhaps she would become a journaling type.  that was the justification behind the gift, anyway!


Spine with embellishments of hand made beads, jewelry bits ( some of the ugliest dated jewelry can make the most wonderful embellishments!!) and glass beads.


The cover paper is done with a fun technique that starts with severely crumpled paper.  Then varnish mixed with mica powders is brushed over the wrinkles, allowed to dry and then the paper is sprayed with spray acrylic inks and coated with a gloss sealer.  Pretty snazzy,  eh???   (these colors are perfect for Sarah!)


The foundation of the book was a french bread pizza box.  It appealed to me as it was long and thin and a very unusual shape for a book.  The first signature cover page on the right was done using a gesso resist technique. (Another favorite of mine)


I included several pockets throughout. The pocket on the left was created from a paint brochure that I picked up in the paints isle at our local Lowes home store. Great images with great color and they are free hand outs!!


Here you can see tow signature covers done with gesso resist and messing inks techniques similar to what you find on Roben Marie Smith's fabulous blog!!  Super messy and fun!!
  Sarah has thoroughly enjoyed the hand made gifts that I have made for her in the past and goodness knows I cannot afford the items from shops, that she aspires to own!!  She is majoring in Environmental Studies and Marine Biology, so I added images and used colors that would fit with her interests and hopefully will inspire her to document her experiences or joust use the journal to gather bits of her life.  We shall see.  She seemed to be very pleased when she opened the gift and had to be cajoled to open other gifts as she was quite interested in looking at all of the details.  A very good sign!! :)


 I did get in some holiday baking as these Almond Filled Swedish Coffee Breads have become staple gifts for the holidays!  Wish you could small the incredible fragrance of these babies!! YUM!!

I am still working on gifts to be shipped out to my brother and his family in Ethiopia- yes, they have moved again and are now settled in Addis Ababa ,the capital city.  My Sister in Law Elise  is working at the Embassy and brother Peter  is digging in and creating soil wherever he can find interest and spots to do so!! 
As Elise has her birthday today December 26, a late package seems to be appreciated to extend the festivities! I have started Monarch scarf number two and am working on jewelry and art quilts for the whole family. 
 Wouldn't EVER wan to be without a project!! Check back here soon and you can see what  I have cooked up for that part of the family!
I hope that everyone had a nice Christmas and holiday in whatever form you celebrate and I want to wish a Happy Boxing Day to all of my British, Canadian and Australian friends!! ( Someone please educate me on how one celebrates Boxing Day these days!!)

Monday, December 17, 2012

Simple can Help .................

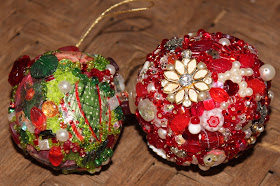
Sometime early last week, I came across a neat Tutorial for making Beaded Christmas Ornaments using trash and left over bits of jewelry and beads.  The tutorial is available here and I must thank Jenny at  Jenniebellie Studio for her wonderful blog and terrific artistic spirit.  I watched her video tutorial and then set out to make this technique more my own.  For the interior of each ball, I used wadded up plastic grocery bags for the first and then moved on to wadded up used drier sheets wrapped in a plastic bag for the second.  After wrapping the bags the held it all in place with lots of scotch tape, as Jenny suggests, and then covered that with white tissue held on with white glue. This first ornament I did according to Jenny's instructions.


You can see that I used some vintage buttons and some bits of old jewelry along with seed beads and larger beads from my stash of left over beady bits. For the next ornament, after drying, I added some of my own fabric/paper scraps in various patterns. Jenny showed her "Baubles" as she calls them, done entirely in beads and jewelry, I wanted to speed up the beading process and also to add more of my own style to each ornament.  I am now calling these creations, my Mosaic Beaded Ornaments.


Here is the first ornament done with my fabric/paper and beads.


Ornament #1 and #2.

With the horrific and heart-wrenching news of last Friday, I turned to my art to calm my nerves and force me to concentrate on something other than the huge flood of pain that is washing over us all. This process of creating from "trash" and gluing on beads and bits in a haphazard mosaic fashion was, and is, very soothing and gratifying. The repetitive and quiet process of adding beads and bits was extremely soothing and peaceful for me. With each sparkling crystal I place, I think of a child's laughter and the joy that was brought into the lives of parents and their teachers despite the life being taken far far too early.  that laughter and joy can Never be erased from the hearts of the loved ones who are left behind.  As the ornaments hang sparkling and twinkling on our tree, I look at each twinkle as representing the precious smile of a child.  These ornaments are gifts for other's and those that receive them will know that they were created to help me walk out of the darkness through the power of Art!  I have quite a few of these ornaments planned and it will be an activity that I look forward to after a busy day, for quite awhile.

We must all work hard to overcome the strangle hold that the gun lobby has on our society. We MUST be able to honestly tell our children that we are doing everything in our power to keep them safe and secure.

For the next Mosaic Beaded Ornament, I started thinking about combining fiber with the beads and bits. So after the tissue paper drying bit was done, I glued on bits and snips of vintage lace and trim and then filled in the spaces with crystals and old pearls and flat backed crystals.  ( A great place to find inexpensive, very sparkly flat backed crystals is in the Scrap booking area of your local craft store!! If they have adhesive backs, be sure to add some glue as the sticky back will probably not hold up well over time.)


I also added some strips of muslin that I had written on.  these bits were left over from an old project and I am pleased with the vintage text effect that the scraps add to this ornament.

There are so many directions that this tutorial can be taken, be sure to stop by Jenny's blog and check out all of the fabulous projects and inspiration that she has to offer!!!

Friday, December 14, 2012


So many innocents gone in the blink of an eye. Sadness does not even begin to describe the feelings..............We must never allow their precious light to be extinguished.

Felting Experiments


Recently I came across a wonderful little felting tutorial on You Tube. I have been interested in creating some felted flowers for quite awhile and here were some very intriguing instructions.  this rose was my very first attempt and I am thrilled with the simplicity of the technique.  All of the petals are felted as one piece using plastic for resists.  To the merino tops, I added some silk fibers in various colors as I did not have any appropriate colored silk hankies as the tutorial called for.  Check out the video and go make some felt roses!!


After being inspired by my friend Ro Bruhn's fabulous felting examples, I pulled out the fibers and fabric ( silk and scraps of felted sweaters) and had a go for myself.  This truly was just for play and was a decompression exercise following my whirlwind Workshop of last week.


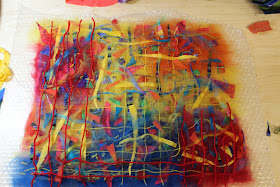
To start I laid out merino tops color block fashion and then started sprinkling on bits of silk fabrics ( most of my silk fabric is harvested from Thrift shop finds) and yarn scraps followed by silk fibers.


After wetting out the fibers, i was ready to ROLL!!! And Roll and Roll and Roll and ROLL and ROLL I did!!  And then I rolled some more!  Next came the throwing to shock the fibers into place.
Thanks Ro, For the inspiration!!!


Here is a close up of a portion of the felted collage.  Not a single needle was used to create this project.  Now what to do with it???????  I have a plan up my sleeve and I will share it with you very soon!!


Monday, December 10, 2012

Art Journaling Workshop-From Cereal Box to Amazing Journals!!

On December 5th, I had the great pleasure of holding an Art Journaling Workshop for art students from Dominion High School in Loudon County, Virginia.  The students traveled down to Fredericksburg from Loudon County  by bus and met me at Artful Dimensions Gallery for our creative adventure.


15 students,2 teachers and 4 large tables filled the main gallery of Artful Dimensions with creative and colorful construction and learning.


 We used recycled cereal boxes to create unique art journals and covered them with papers created with varnish, mica powders, acrylic paint, spray inks and matte medium.


This beautiful cover is ready for some time on the floor to dry.


Watching the ink drip along the crumpled paper.


 After the morning spent creating various papers for the journals the ladies traveled down the street- all of 200 yrds to Castiglia's  Italian  for some delectable pizza.  The proprietor, Luigi  had the pizza's ready and waiting for the girls as they walked in!!

After lunch we constructed the journals and discussed the many options for journaling and use of the books.


The girls did a fabulous job with their journals, don't you think? They are well on their way to exploring all of the wonderful possibilities that the routine of Journaling can add to their creative lives.


At 3pm the girls had to be on the bus and ready for their trek back to Dominion High .  We could have gone on for at least several more hours and reconvened the next day for more!!!   Plans are in the works for me to travel up to northern VA , during the spring semester, to spend some more creative time with this wonderful class!!

*****The idea to create these journals from cereal boxes came from artist Jennibellie and her fabulous tutorials!! She has some amazing ideas and you can see her tutorial for this basic idea here.  I started with her idea and have made the technique my own.*******

Wednesday, December 5, 2012

Sun Prints, Resin and Fabric/Paper


Here are a few shots of some jewelry that i created in time for this weeks First Friday Opening at Artful Dimensions Gallery.  I have been thinking about this piece for a long time.  I love the shape of hearts, the symbol, what it represents and the universality of that symbol.  I created these hearts with fabric/paper collage and then rimmed each heart with a golden edge, backed each with my own sun printed red fabric and encased each one in Ice Resin.  I added some of my fabric/paper rolled beads that were also dipped in Ice Resin and combined them with glass beads and bits of vintage copper chains.


The second piece that is ready for display is called Blue Bee.  This wonderful brass bee is mounted in a square black bezel that contains a piece of my gold/green/blue fabric paper all held in place by Ice Resin  .  Hanging from the Bee's antenna are a collection of tiny gold chains, a tiny vintage glass prism and some glue and green glass beads.


I am having some wonderful success with experiments using my sun printed linen textiles in combination with the Ice Resin.  They are not quite ready for prime time, but I will share them with you very soon!