Wednesday, January 31, 2007

ATC's for swap using background Techniques from Artist Trading Card WOrkshop by Bernie Berlin

It was getting to be time to get these cards done. That meant that I had to chose a background technique from Bernie Berlins book. I decided to do the Fused Fiber technique with my own twist of course!! Here are the supplies that I used:


I used cardstock cut to 2.5x3.5 inches. Then I glued a piece of painted paper towel down and placed snippets of all of the fibers, painted netting and sequins that you see in the picture above, on top of the painted paper towel. Then I sprinkled on clear embossing powder and placed a 1 inch wide strip of fusible webbing over all. I covered the whole thing with a piece of parchment paper and ironed it on the silk heat setting of my iron. Once it had cooled, I removed the parchment paper and sprinkled on cut up bits of Crystal Green Angelina fibers. Then I replaced the parchment and ironed for no longer thatn 3 seconds. These backgrouds were the results of my melting playtime!


The Angelina fiberr fuses to the whole thing and gives the cards the sparkly shimmer!! I love this technique!!


I added a red tulip cut from cotton fabric, a stem cut from some painted paper and the word "grow" that I had stamped on another piece of the paper used for the stem and leaf. Then I sewed everything down onto the card and did a zigzag stitch around the whole thing!


Here are the resulting ATC"S.


These is a technique that I know I will be using again and again!!

Saturday, January 27, 2007

Illuminati of Creativity

I have created another found/discarded object art doll. Let me first say that this creation was put in motion when I saw a doll created by a very talented gal from the Southwestern United States. i cannot take credit for the use of the light switch. The rest of the doll evolved as I was working on her.

Her body is a used electric light switch that moves "on" and "off", that was purchased at a Habitat for Humanity Restore for .25. The switch is lashed to honeysuckle vines from the yard, the Blue Jay feathers were gaathered in the yard as well. Her face is polymer clay. Her robes are made from a burlap rice sack and painted cheesecloth.

She is my Talisman of Flowing Artistic Energy who will infuse my art space with light and good creative spirits.
The fabrics, cotton yarn and cheesecloth were painted with Lumiere paints.

Close up photo shows the Spirit Flow in the conserve position.

I know that many of you are probably shaking your heads and thinking that I have gone too far 'round the bend this time. But when you next visit my art space you will feel the positive creative karma that she exudes! Don't knock it till you've tried it!!

Friday, January 26, 2007

Play time with Paint!!

After finishing my Panda Black and White witha Splash of Lime work in the altered book, I had a pile of scraps of paper left over. I am trying very hard to cut down on clutter (ok, I hear y'all laughing) So instead of stuffing the scrps in a drawer I glued them all down on a piece of sketch paper.
Next I put several colors of acrylic paint down on a meat tray (my favorite pallette) and picked up some of each color on a credit card. Then I scraped the card with paint over the collaged black and white papers.
And here is a second sheet that I did in exactly the same way. Once you start with this technique, it is hard to stop so it is best to have lots of paper at the ready!!

The papers that I used included old sheet music, pages from an old french dictionary, the insides of security envelopes and the bar codes from luggage tags from air travel.

Next I was off to paint some fabric!

I am prepping to make several small beaded Goddess dolls as samples for a class that I will be teaching. I wanted to paint the fabric as the first dolls that we will make in the class will not be entirely encrusted with beads. So I painted some fabric so wherever the bads were not placed there would be some color interest.

First I placed my muslin down on a sheet of freezer paper and wet it down with water. Then using a medium sized paintbrush, I put on lumiere paints in different colors. (I am addicted to Lumieres, but regular metallic acrylics in the little bottles would also work very well for this same effect.) I spattered on some Blue Pearl paint as a last painting step. By this time the fabric was well stuck to the freezer paper. It did not take much paint as the water really moved evrything around quite well and I did not want the fabric to be stiff in the end.

Next I took a handful of Kosher salt and sprinkled it over the wet painted fabric and left the whole thing to dry overnight. Here are the results!!

I peeled the fabric off of the freezer paper and flipped it over and this is what I found!!

Sorry about the glare. I am equally thrilled with the wrong side of this piece!! The shineyness is caused by the sticking to the freezer paper but that is really not too aparent in person. This side has much more of the watercolor wash effect. This will work out very well as the background for my Goddess dolls! Yes, I will post pictures of her when I finish her!!

Thursday, January 25, 2007

More Altered book Spreads

I have just finished up working in one of the books for the "True Colors" style RR that I am participating in. This book was sent out by Wanda from Arkansas and her color choice was Black and White with a Splash of some other color. As we started planning this Round Robin back in June, I was on the look out for things to use in the books. Let's just face it, I will pick up and save just about anything!! After a trip on the Washington D.C. Metro system, you are left with a fare card. As there has been a baby Panda born at the National Zoo and he is way more popular than any political figure, there are pandas printed on the fare cards. you guessed it! A Keeper!!

The colors that I chose for Wanda's book were Black and White with a Splash of Lime. (It also makes me think of hot summer afternoons with a tall Gin and Tonic!!) The whole layout revolves around thie Metro Fare card, of Course!!! I used fabric and sheet music, interiors of security envelopes (they have really neat black and white patterns on the insides so people can't see thru the envelopes), paper measuring tapes and ribbons, candy wrapper foils, buttons and pages from a french dictionary. I also did some stamping and I put the whole thing together on the sewing machine- I didn't use any glue. The stitching adds a whole other layer of texture. There is some glare from the flash on the plastic window that I placed over the fare card. I decided to make use of the window that already existed in the envelope. These layouts were great fun to put together and I hope that Wanda likes my work.

THis RR project has been really good for me. I know that my art is being pushed in directions that I might never have gone if I had not started this project.


Under the picture of the panda,on the left, is a pocket made of fabric. Hanging from different ribbons are different black and white things. A collaged domino, a quote from Margaret Mead, A stamp from Dubai and some black and green beads.


This is the second spread. i painted the green paper using the scraped paper technique and then overstamped the fern image.


This is the sign in card that I created for the front of the book. Each artist was asked to create their own tag and include their name and e-mail and snail mail addresses.
This book will get sent off to Florida to the next artist, tomorrow.

Tuesday, January 23, 2007

Warning-Double Posting!!

Sorry everyone, I don't mean to bore you!! I did not realize that I had already done a post on the Birthday Art doll. The class that I taught over the weekend really wiped out my data bank- the one in my head at least. The second part of the latest Art Doll post IS NEW however. So just go on and skip right thru the Angel Birthday Doll portion. I must try to be less scattered- YAh RIGHT !!!!!

It's a dog's life!! (At least it is at our house!)

Buddy ,the rat terrier, has found the optimal spot for absorbing the maximum amount of morning winter son. Now all he needs is a pair of shades and a sun reflector thing to tan under his chin!!
Of course , if Dad is willing to stand ther and scratchmy head and behind my ears, all the better!! One must ask, "Who is running this house anyway?" Is there really any doubt???????

Vanna, (no Mitzi) does painted paper towel!

I got together with my friend Mitzi last week and I taught her the terribly challenging technique of painting paper towels! We had more fun than three year old's with gallons of finger paint!!

The next time that we get together I am going to start her on her first altered book. We
had a blast!
We did several different methods. the first was just wiping the paint loaded brush onto the damp paper towel. The second method was squirting paint directly on freezer paper and then we took"prints" from the paint with the wet paper towel. In two hours we had a giant stack of papers that we will now use in all sorts of wonderful creations. More fun than a person should be allowed to have!!!!

Fabric Fusion Charms


Several posts back I spoke of some fused fiber experiments . Well I have made 30 charms from the fabric pieces that I created and have sent them off to the members of my Surface Design yahoo group who are participating in this swap. I was very pleased with how they turned out. I have two pictures. The first is the front and back of the sheet of fused fabric before I cut it into 1 inch squares.
After cutting the block of fabric into 1 inch strips, I did a very tight edge stitch and then wnet around the edge with Stickles glitter glue. then I added an eyelet to each one. THese are being sent all over the US, Norway, the UK and Australia.

New Art Dolls


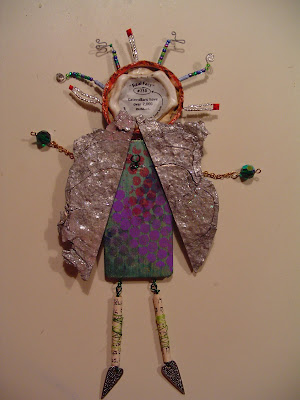
I have created several new art dolls during the past several weeks. The first was a birthday gift for a dear friend who is involved in my Altered Arts group. This doll is actually an Angel. Her wings were fashioned from a pulverised soda can that I found on the street while walking the dogs. I cut the metal with tin snips and then forced some glue in between the layers of aluminum to keep the metal from falling apart. I embossed the wings with clear embossing powder and then sprinkled on tiny flecks of holographic glitter for some sparkle. The angel's head is an old electrical caopacitor backed with a smooshed Snapple cap, also retrieved from a parking lot. You can see the fact printed on the inside of the cap in the photo that shows the back of the doll. I just couldn't cover that up! The dolls legs are made from the pages of an ancient crumbling book of hebrew prayers that I found in an antique mall. I opened the book and the very first page was titled "Prayers for the Government"- not sure that there are enough prayers for that, but hope lives on !! The hebrew text is so beautiful and I rolled two sections of page and bound them with thread in different colors. Her little feet are heart charms.


I finished the next two dolls this past weekend. The first is a gift for a friend. Her hair is made from soft fiber fringe and her head is backed with an Orange Crush Bottle Cap.


Her legs are made of hand painted fabric rolled beads and the quote on her dress reads: "A smile is a curve that sets things straight." One of my all time favorite quotes, credit- Phylis Diller (she had very wild hair too, as I remember!!)


The next doll is my first Pin Doll. I amde this doll to wear to a class that I taught this weekend titled Found Object Jewelry. ( Note to self: Focus on one or two techniques , don't try to teach it all!!!! The class went well but I was exhausted- my students went home and continued creating so at least I lit the fire!!)

This little lady is sporting a crystal bead necklace with a "Laugh" charm on it and Go-Go boots made from old earrings. She is such fun to wear and she got alot of attention!

Wednesday, January 17, 2007

Fabric Post Card


I have just created a set of fabric post cards for a swap. The title of the swap is" A is for........" There will be additional swaps for every letter of the alphabet. I have signed up to make 4 cards for the letter A and 4 cards for the letter B. After the B cards are complete I think that I will take a break from these swaps as my Altered Arts groups is going to be starting some very involved projects. We will be able to share with each other in person. Sharing your artwork with another artist who is working on the same project is always much more fun than doing the more"anonymous" swaps that take place over the intenet. Although one really does get to know the members of the online groups quite well if you are active in the message boards.

Anyway here is my "A is for Artistic Arch" Fabric Post Card.
The interior of the arch is painted Tyvek that has been ironed to add texture- the heat creates the bumps, actually melts the tyvek. The arch was stamped usinga rubber stamp on muslin and sewn on hand painted muslin that had been embossed with gold. Lots of fun experiments went into creating these cards. The folks at the post office are getting used to my bringing them in to be mailed. I ask them to be hand canceled and they go rightthru the mail as is. The post office workers always have some interesting comments and questions. It never hurts to bring some art into the daily lives of other folks!!

Birthday Art Doll


I have just created a new Art Doll for a dear friend's birthday. I have just recently met my new friend Lanise but I feel like I have known her all my life! She lives in the Blue Ridge Mountains of VA has grown children and she bleongs to my Altered Arts group. Since I began making my funky, transistor headed art dolls she has been one of my biigest cheerleaders. Her birthday also happened to fall on December 30th, a miserable time of year to have a birthday. So I decided to make her one of my special ladies. This is what evolved as I worked. I don't generally start with much of a plan , these gals just evolve on their own. Her legs are made from the rolled text of a crumbling Hebrew prayer book and bound with colored threads. Her feet are heart shaped charms. HEr wings are made from a crumbling crushed soda can that I retrieved from the street during a recent walk with the dogs, Pepper and Buddy. Her halo is a flattened Snapple bottle cap that I found in the local Target parking lot. So here she is!

First Beaded Goddess Art Doll


I have always been fascinated with beadiwork, especially that which is encrusted with beads. This interest prompted me to join a very friendly "open to newbies "art dolls Yahoo group. I had previously begun amking my own art dolls but I wanted some assistence with the beading part. This group makes lots of goddess dolls and has lots of swaps. It has been the perfect place for me to learn!

This is my first attempt. She is my Goddess for the WInter Goddess Swap and she will soon be making her home in Nitro, W.VA with Edna!

i made her form first by layering muslin with a sparkly silver mesh fabric and machine stitching all over to hold the two fabrics firmly together. Then she was stuffed and her polymer clay face was glued on. Then I just sat down with a selection of white and clear beads and started beading. It was hard to stop!!


The mother of one of my son's good friends say her and has asked me tot each her how to create a goddess doll and to teach her how to do the beadwork. Myfriends at the Whistle Stop Bead shop want me to write a curriculum for a class forcreating Goddess dolls!!

I guess that I have more teaching ahead of me!! WHOOOOO HOOOOO!!

Saturday, January 13, 2007

Reaching Way Back!!

As I proceed thru all of my artistic adventures, I am amazed at how often I reach back to my earliest art experiences, to call up old skills.

As a result of the Charm swap that I participated in with my Altered Arts group, I am again using my wire jewelry skills. Our meetings are held in the work room of a wonderful rubber stamp shop in Reston , VA; Angela's Happy Stamper. We all decided to create an extra charm for Angela to thank her for letting us use her space without charging us a fee. I took on the task of creating a necklace from the charms. I chose 16 gauge copper wire that I purchased at the hardware store, got out my needle nose pliers and cutters and got to work. here are the results. We will present this piece to Angela at our group meeting tomorrow, if we can cajole her to stop by the shop while we are all there!
2 views.
We are quite sure that Angela will be thrilled! Every time that I look at all of my charms that I received from this swap and at this necklace, I am so very grateful for this incredibly talented and giving group of artists that I am lucky enough to have found!!
Althought he quality of this photo is not the best , it shows the links of the necklace that I created. I must also thank my good art friend Ruth from CA, who shared her technique for creating quick and easy links for displaying a multitude of charms!! Thank you so much Ruth ,for sharing your skills with all of us!!
Now I have to continue to make links to create a similar necklace for myself! I still have two more charm swaps that I am participating in !! One is an international swap for 25 charms and the other is a Fiber Arts Charm swap, also for 25 charms. I will post pictures as soon as the charms arrive!!!

Altered Book Spread

I have completed anopther spread for an Altered Book from the True Colors Round Robin that I am hosting. The colors for this book are Aquamarine, green with copper highlights. This is a beautiful leather bound book from an art friend who lives in Minnesota.

I started my work on this book by creating a focal piece using synthetic felt. I painted the felt piece with various colors of acrylic paint, sprinkled on embossing powder and heated the whole mess with my heat gun! After several more layers of embossing powder was added, I stamped into the hot mess with an inked stamp and allowed the whole thing to cool.
This is the result of the Tortured Felt piece. I completed this focal point by edgingit with copper paint and highlighting the word "butterfly" with a lavendar gel pen.
this is one of may favorite stamps and sentiments. It says "there's nothing in a caterpillar that tells you it's going to be a Butterfly.
This is the left hand side of the finished spread.


And this is the right hand side.

Beaded Earrings

A friend asked if I could create some beaded clip style earrings for a gift for her Mother in Law. Of course I took on the job, being not quite sure how I was going to proceed. We picked out the beads and I got the clip backs and set to work. Here are the results of my first bead encrusted, embroidered bead earrings.
I am quite pleased with how these turned out ! They are about the size of a quarter, maybe a tad bigger. I think that everyone will be pleased.

Fiber Fusion Experiments

I have been playing around with fusing , melting, painting and all around fiber attatchment recently. I am participating in a Fiber Arts Charm swap on one of my Yahoo groups and I have been very inspired by seeing all of the beautiful work that people are doing. This is all very mind stretching!!! Below you wil find some pictures of starting materials followed by a progression of techniques that I applied. This was all done purely as an experiment. I tried very hard to not worry about the final product but just see what I could achieve with the materuials that I combined and how I manipulated the fibers.
This is my collection of starting materials. I painted an old piece of muslin with Lumiere acrylic paints and let it dry. The piece of pink is a torn drier sheet that I painted with pink acrylic paint. The rest is an acrylic gold mesh, foil candy wrappers, synthetic lace.
I pinned this all down onto the muslin and went crazy with stitching on the sewing machine.
I did cut the foil pieces up into slivers and used the lace to help hold everything in place before the stitching took over.
This is the back of the piece after the initial round of stitching.
This is the result following melting of synthetic fibers with my heat tool. Then I added some blue and purple acrylic paint to some of the white lace. The gold mesh melted and drew back as a result of the heat treatment. The drier sheet also responded to the heat by melting.
i am very pleased with the results of this experiment. I am pleased with all of the texture that was achieved and I will do more of this to make one inch fiber charms for my swap!!

Friday, January 5, 2007

Playing with dolls!


I mad this doll as a gift for my niece Jennifer, who is a sophomore in the art school at Carnegie Mellon University. Every art student needs a guardian for their muse! I made her wings from a smashed soda can that I had recovered from the street during a recent dog walk. The aluminum was crumbling and brittle so I peeled it aprt and forced some glue into the cracks and crevases. Then I embossed the wings with glittering glue. All of her other parts are the usual bits and pieces that I have arrainged before. This time her halo is a smooshed YooHoo bottle cap. I just loved the rust and the color! She makes quite the statment and I know that she has found a very appreciative home!!