Monday, August 30, 2010

One Can Never Have Too Many Roses!!!

Two things have jsut occured to me. First, it has been a long time since my last post, my apologies! Secondly I will be only three posts away from the Big 500th post when I complete this post!!!! I feel a Give Away and Thank You to all of you for reading, coming on!!! Stay tuned!! We have had a very busy week getting our eldestr son off to his first year of college! This has been a very large change for all of us, but so far so good!!! We ahve also been feeling chnages in the weather with shorter evenings and cooler night time temps. My Belinda's Dream rose bush is loving the change and showering us with lovely fragrant blooms.


This is also the first fall season that my Gertrude Jekyll Rose has put on a second show. The blooms are much smaller than Belinda's but the fragrance is almost twice as intense. Simply delightful!!!


Since my fabulous class playing with Soy Wax Batik, I have had the itch to dye and paint fabric. To that end I have taken scissors to a stained damask linen tablecloth. I cut strips roughly 1-1.1/2 inches wide and painted each one with Setacolor paints in a very mottled and haphazard fashion.


I was hoping to enhance the damask weave patterns in the cloth and give a very natural graduated effect to the coloration of each strip.

After I had dried and set the paint on each strip, I stitched a twisted each strip into a rose. It is quite hard to see in the pictures but in person, one can see the damask patterns and the varigated painting gives each bloom a very natural look.

I created individual leaves by stitching green painted linen complete with veining in Free Motion Embroidery. After stitching a double outline I cut out each leaf and stitched several blooms together to form brooches. After the construction was done , I covered up the messy bits with some beautiful vintage deep green velvet.


I delivered several brooches to Liberty Town and soon I will be adding some to my Etsy Shop!!!

It is amazing how many blooms one can get out of one large linen tablecloth.


Saturday, August 21, 2010

Recent Swap Creations

Amidst the whirlwind that has been our summer, I have neglected to keep up with sharing the pages that I have created for my Stitched Pages swap. So here is a bit of a catch up! This is a page that I created for Mandy whose theme is Oceans.

I put it all together in this piece, my latest passions for stitching and beadwork and fabric collage. The Sand is a piece of wonderfully textured silk and the sea is fabric collage created as a sheet and then cut to fit. As Mandy lives in the UK, I included sheels that I had collected form New England beaches to adorn her page.

Here I have to take a break from the show and tell, and speak about this wonderful book by Judith Baker Montano!! This book is amazing and a must have for any and all interested in fabric collage embroidery and silk ribbon embroidery. This book is filled with glorious pictures that will inspire and delight even the casual observer!!! I adore this book and find myself going to it for inspiration again and again!!

This next page was created for Ann in Germany. Her page theme is Fairy Tales and I chose Thumbelina by Hans Christian Anderson as the source for my inspiration. I used one of my photos that I printed on cotton lawn and stitched it to a sunprinted background. then I inserted a tiny stamped and painted fairy in amoung the flower petals.


Finally my most recent page is for Kath in Crete. Her theme is flowers and I had no end of ideas for her page. I finally decided to use a Viola print from one of my favorite photo series. Again this is one of my own photos.


I backed the printed photo with a swath of silk paper and then a hand dyed green background. I did all of the work on this page by hand which I find myself going to again and again. My won version of slow cloth, I guess. When I create with lots of hand stitch , I feelt aht I really know the piece that I am working on and that I have truely put a part of myself into my work.

On this page I finally mastered creating Fargo Roses with silk ribbon, as well as several other rose forms from Judith Baker Montano's wonderful book. I used a bit of vintage lace and then added beads and leaf trim to fill in the flower swag.
We still have 6 months to go in this swap so I will be showing you more pages as I create them.

Tuesday, August 17, 2010

Found Treasure makes Wonderful Jewelry


Last week I made one of my infrequent trips into the local Goodwill store, just for a little look-see. Look and see what I found!!! Four of these wonderful porcelain divided plates!! They were $1 each and absolute perfection for bead sorting and creating!!!
After finishing Judy's collage necklace gift, I still had quite a pile of goodies already picked out and lined up on my table. I went with the flow and kept right on creating!! I came up with two more necklaces taht will serve for now, as samples for my upcoming Collage Jewelry Classes that will be offered at Artistic Artifacts this fall.

This Cooper and Turquoise piece is made using only vintage chain bits. The inspiration came from some Tyvek beads taht I created quite awhile ago and had forgotten about. Rumaging thru one's stash always uncovers buried treasure!!!!


The chain on the right in the picture below is a wonderful piece from a deco bracelet. I just love the unusual shape of the links. Hanging from the triangle links is a leaf carved from green turquoise. Just below the leaf you can see the inspiration bead made from tyvek painted with metallic paints before melting and shaping. These tyvek beads are amazingly sturdy and lightweight, and wonderfully quick to make. Bekow the bead hangs a chunk of turquoise and an Indian coin from the 1940's.
I also used small tumbled amythest beads and a wonderful old terra cotta bird bead from a broken indian necklace that I found out in Colorado. Perhaps the most unusual bit on this necklace is the bit of broken copper car key that hangs form the bird. I found this key on a ring at an antique mall in Fredericksburg. The other keys with it showed an amazing amount of smooth rub wear and this broken key has been rubbed so smooth that there are no sharp edges. The carrier must have had his hand in his pocket constantly handling his keys. If the keys could talk , I bet that there would be quite a story to hear!!!

Hanging at the very bottom, below the square turquoise chunk, is awonderful Raku bead with the neverending swirl symbol on it. I adore this bead and wish that I had bought many more of them when I had the chance!!! I came across them at at Art and Soul vendor night in Hampton VA, 4 years ago. They were sold by a local bead vendor who I believe has since gone out of business. If any of my wonderful readers knows of a source for Unusual Raku beads, please, please drop me a line!!!


Then I created this Ocean Wave Collage piece using treasures gathered during my trips to the ocean.

The blue heart bead and the other small donut beads are all recycled glass
made by polio victims at a wonderful art center in Tanzania. My wonderful brother stops by the Art Center every year to gather more of these wonderful beads for me!!! Lucky ME!!!
The heart is suspended by a length of vintage sterling silver ball Rosary Beads that I discovered in a bag of costume jewelry. They were very black and sorry looking, but absolutely amazing when washed with a bit of silver polish!!!
Then on the right is a wire wraped piece of old lavendar sea glass fromt he waves on Cape Cod and on the right is a piece of Quahog shell that sea worms very nicely left with wonderful holes, just for me. When I was much younger , the holey pieces were always discarded as they were not perfect! Now these a re the ones that I treasure!! This shell is incredibly dense and difficult to drill, so when I find them with holes, all ready to become beads I am thrilled!! In this particular bit of shell I wired in two white fresh water pearls and then dangled a lavendar pearl form the bottom edge. I love the way that the worm trails and holes add so much glorious texture to the shell bits!

In this shot you see more of the wonderufl donut beads from Africa and my signature underwear bead with more pearls. Then I took a small lucky stone- the black stone with the continuous white quartz ring, and wire wrapped it in silver wire.
I so enjoy all aspects of this process, from the hunt, to the gathering, to the contemplating and designing. Then when each piece comes together into a wonderful whole, I know that I am doing what I should be doing, at that very moment...

Sunday, August 15, 2010

Here IT IS!!

The Birthday Girl was gifted last evening and I must say I was overwhelmed by her response! There were tears all around and the necklace was worn immediately and THEN shown to the gathered group of artists who were clamboring to take a look.!!! There is nothing like the feelings of working ona piece of artwork for someone that you care about and adding bits that you know will ahve special signifigance to them and then ahving the response to the gift be so very heartfelt. I feel as if Judy gave Me the gift last night , not the other way around. This is essentially the central reason that I create my artwork. Sure it is nice to have others value it enough to purchase it, and it is nice to set a goal and to be able to meet that financial goal with monies generated by sales of my work, but it is far more the personal interactions and connections that are created that infuse my spirit with the desire to create.
I took several close up shots of the necklace to show off the details as a full shot left alot to be desired! The back of the necklace is chains of various sorts, quite decorative in this case. At the top left of the above shot you can see a snippet of the wonderful blossom shaped links that form the left side and on the right, I simply opened up a wonderful bali silver bracelet and used the clasp of the bracelet as the clasp of the necklace.


The central dangle is formed by a wonderful vintage rhinestone button that has three lobes to it so it was perfect for uniting the sides of the piece. WHO does not like rhinestones and sparkling hand carved vintage cryastal beads???? Then on the right, you see a small gold locket where Judy can place a picture of her choice. In between each element I added freshwater pearls and used my favorite underwear buttons as linking elements, all wrapped up with silver wire. Judy has a serious addiction to vintage buttons and has enabled my collection on many occassions!!


My favorite part of this piece is the central dangle. The basis of it is a vintage shoe clip. This is the accutal clipping portion and I flattened and filed the sharp little teeth on the back that would have held the clip securly in the shoe. Then I affixed the wonderful vintage rhinestone earring to the top to hide the attachment area and added a leave shaped pendant carved from quartz crystal and a wonderful soldered charm with a photo of two little girls.
As I created this special piece, the pile of possibilites on my work area grew as I pulled out more bits, and as I dealt with design issues and thoughts and ideas bred more thoughts and ideas. When this piece was completed, I continued on to create two more pieces that I will use for class samples. One piece is created using copper and turquiose elements and the other is based on the treasures that I gathered during my recent trip to the beach.
These pieces will be the subjects of future posts!!

Friday, August 13, 2010

Bits As Parts of A New Whole......


After a while, many of us who collect old bits of things, old buttons, watch parts, beads and hardware, find that these treasures start to FIND us. I have several friends in various parts of the country who know what it is that I collect and who keep their eyes open and ears to the ground , with my little list in mind. Occasionally, I will find a box or an envelope in the mail with broken jewelry, rusted metal or old buttons and linens tucked inside. Many other folks ask me what I do with all of these bits of fluff and whatnot and to some, TRASH. So I thought that I would share a bit of my creative process with you! Above you can see a picture of some of the various bits form my stash, everything from broken jewelry chains, to single earrings, to beads and old buttons.

THe majority of these items I modify in some way. I will combine a single earring with the decorative back of a vintage shoe clip to show off the wonderful embossed decoration on the clip back. I will wire several buttons together to make an attractive dangle element and I will seperate the chains into smaller bits and reassemble into a collage chain format. I also make my own bead elements out of bits of quilted fabrics, hand painted cloth and seed beads. Sometimes I add beads created from painted and melted tyvek or distressed felt. Anything that is found with a hole in it becomes a bead or I will find A way to wire wrap a hole-less item or drill a hole in something that was not intended to be a "bead".


For example, here I have created a sterling silver wire and vintage button grouping to create a necklace dangle. The underwear button (pre elastic invention, with the two oversized holes) has two mother of pearl childrens clothing buttons and a white leather shoe button attached to it.


In the picture above you can see a collage that I have created in a vintage watch case. After I have amassed my elements and created a theme for my particular creation , I begin linking all of the bits together to create a jewelry collage. I cannot share anymore pictures of this particular piece right now as this will be on it's way to a dear friend, for a birthday celebration. WHen the piece arrives at it's destination, I will be free to reveal the entire piece.
I may not know what I will be using each and every little bit for, when I find it, but I do know that each part will play an important role in each of my collage jewelry creations. By putting all of these little bits of singularly insignificant ephemera together, a new creative and cohesive whole is formed and each bit is honored as an integral member of that new piece of jewelry


Saturday, August 7, 2010

Oh BOy! It's Soy!!! Workshop

What a fabulous weekend I had learning new techniques, making new friends and making big messes, and some pretty cool fabrics as well!!! Textile Artist Lynda Prioleau gave us her all and led us thru the fun and mind warping somersaults of planning that is at the heart of complicated surface design and batik..


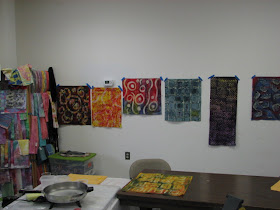
As we created our complex cloth, Lynda had use post the pieces on the walss of the Artistic Artifacts studio. It did not take long to cover the walls with color!!! Isn't Lynda Beautiful???

On Saturday we began at the begining, with Lynda showing us the in's and out's of working with Soy wax and the miriad of ways to apply it to fabric.


We mixed up dye as well!!

Then it was our turn to play and play we did!!
Wonder of wonders we actually have evidence of Judy taking some time for herself and away from her demanding job as Proprietess of Artistic Artifacts, to play in the wax, paint and dye! Judy created some amazing fabrics and we know that we will be able to get more evidence of her creative time!!!


Artistic Artifacts has the perfect setup for a full scale workshop. We hung our drying fabrics, in all stages of production, in the loading dock area to catch whatever breezes were available!!! The hotter the day the more vibrant the dyes. Needless to say we got some vibrant color!!!!


We used donut cutters, jar lids, the ends of empty spools,wood stamp blocks from thailand,rubber stamps, paint brushes,potato mashers, whatever we could put our hands on, to create pattern and design!


This was my first piece of Soy Wax complex cloth. First I applied soy wax with a paint brush in a swirls pattern, then dyed the cloth with yellow procion dye. After removing the wax with an iron and newsprint, I applied more wax using various tools to create rings and circles and splatters. then I brushed on blue dye and red dye.


Our class creations!


> I created this piece using soy wax and textile paints. I plan to spend quite a bit more time exploring the possibilities of Soy and Paint.

FOr this blue piece above, I started with a periwinkle blue fabric and added wax and dyes. Staring with a piece of colored fabric completely changes the scenario and adds so many possibilities!!!
Here are my washed and completed batik samples from my two day workshop with Lynda!!!


This piece is my favorite! I spent a very long time creating this piece, and by doing ,so I really got the process of layering color and using eh wax to protect the previous applied dye, worked out in my head!!!

I am already planning on working with Soy Wax!!!! The dyes are ready, the fabric has been treated with soda ash, all I need now is a big Block of time. A clear falt surface would also help, but that is another issue!!! :)