Saturday, May 28, 2011

Object Lesson with Laura Wasilowski

Many of you were anxious to see a picture of moi wearing the shirt that I blogged about here. Now you can't say that I never do what you ask!!! Here you can see the delightful Quilter, teacher,artist and Chief Administrator of the Chicago School of Fusing, Laura Wasilowski!! I was so fortunate to take a class with her last week at Artistic Artifacts in Alexandria VA.
Laura is a total delight!! She is a font of knowledge about so many things to do with fabric and art quilts and fusing. She dyes all of her fabrics and sells them along with glorious hand dyed threads and her books and her wonderful quilt patterns, HERE. Prior to taking this class I was not fond of using fusibles in my textile work because I was never really happy with the results. Here was my chance to learn from a Master.
And oh boy, did I LEARN!!!

And did we have fun learning!!!

Little did I know that Laura would teach us using interpretative dance routines and song!!!

What a riot!!! What FUN!!!


We were each given two large pieces of Laura's glorious hand dyed cotton. One was a gradation of pastels and the other a gradation of bright brights!!!
Thenw e learned that the only product to use for reliable results and a nice "hand" to the fabric, is paper backed Wonder Under. then we learned all of the ins and outs of using the Wonder Under-" Iron to the Edge and Beyond Everyone, To the Edge and BEYOND!!"
Did you know that if you live in a humid climate (that would be us here in Northern VA) that you might need to let your fused fabric sit for up to a half hour before removing the release paper backing?? Did you know that you should never throw out those sheets of release paper as they are the surface that you constantly create on, as you are working with your fused fabrics???? Well I certainly did not!!

Once we had our fusible attached to our fabric we did a few exercises. We each made several small collages using our fabrics.
This is a badly composed picture of the collages that I put together. Laura also warned up not to allow anything to become too Precious as we would need to be willing to cut up these patterned collages to use in future work.
After a quick break for lunch we were tasked with building a composition based on a single object. Surprise of surprises, I went with a floral element. I know, you are all Shocked!!!!

The wonderful "stripey-ness" of the green portion of the brights fabric really spoke to me as a field of grass. I have been wanting to make a Poppies quilt for my self ever since I made a Poppies quilt for a dear friend. Here. this was my quilt after all of the fusing was complete. I am still not sure if I am done with this portion however. I am contemplating adding two more blossoms somewhere towards the middle of the composition.

Is the center too bare of blossoms? Would adding two more make things too crowded????

I would love to know what you think! is it OK as is, or do I add several more blossoms to the center of the composition?

While you contemplate that question , take a look at the fabulous creation by my wonderful friend Jenn Walker! Isn't this fabulous??? i just adore Jenn's work and she has done it again here!!!

Below you can see how I have treated the poppy centers. I had decided early on in the process that I wanted to bead the flower centers. I know, I have SHOCKED you again!!!
I am so very pleased with the results!! I used a mix of matte finished seed beads and peacock luster coated black #8 beads to create the stacked stamens. They add that wonderful texture and dimension that I love to incorporate!!
This is far from done however. Aside from the Blossom count dilema, I will be adding lots of hand stitching with some of Laura's yummy hand dyed threads followed by some free motion machine stitching to quilt the background. This is not the last you will be seeing of this quilt!!

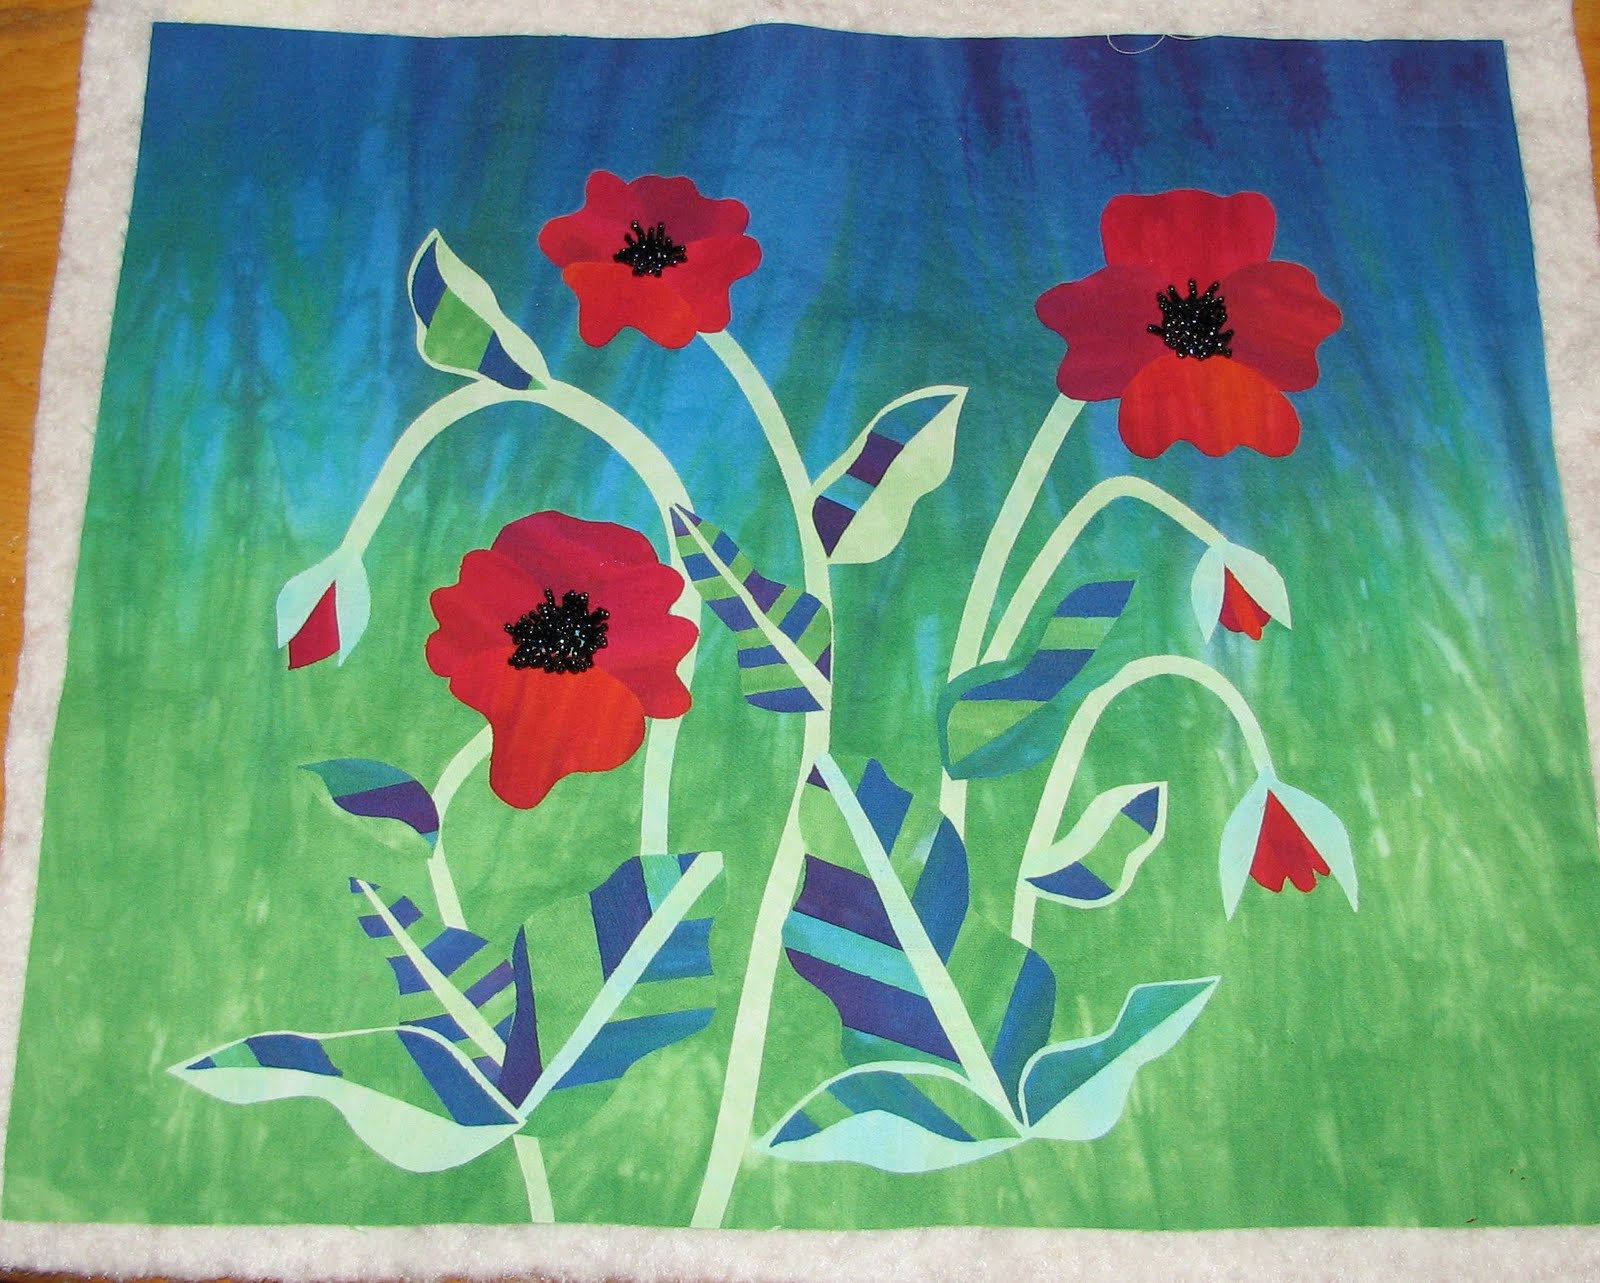
In the meantime, if you are not familiar with Laura's wonderful work, hop on over to her web site and BE INSPIRED!!!
And if you ever have a chance to hear her speak or to take a class with her, grab the opportunity!!!
You will NOT be disappointed!!!!!

Tuesday, May 24, 2011

Flower Power of a Different Sort !

Every once in awhile I get a notion or an idea or hear a whisper from my muse telling me to try something or to do a certain something with some fabric or pictures. Often these ideas get filed away in my brain and now more often I am trying to capture them in my art journal. We will see how long I can keep up with that practice. :) Anyway last week I did some more fabric and linen dyeing and I threw in a long sleeved white Land's End T-shirt that I had picked up at Goodwill.

This is the back of the shirt after the dyeing. The front was very similar to this with a big swath of mostly white running diagonaly across the front. The sleeves were well covered with color. there was too much white across the front for my taste. So Cue the muse; "You could fill that space with color using different fabrics or paints or markers......"
Just last week I took a workshop at Artistic Artifacts with Quilt artist Cyndi Souder, on using the Tsukineko Inks to color fabric but the effects are much more subtle than what I was envisioning here. I love what can be done with the Japanese inks but this shirt was calling for big bold color.
So out came my Zig Markers from my scrap booking days in Oklahoma. I have a complete set that I had not touched in years and was not even sure that they were still liquid. They are still strong and juicy and ready to go. I was thrilled as this fits right in with my ongoing efforts to use what I already have!!
I Did not think to take photos till I was well involved in the project so you are going to have to use your imagination here.

So to start, I used my Superfine Faber-Castell black Pitt pen to doodle on the shirt. I put a plastic bag inside the shirt to stop any bleed through of color. In the picture above towards the bottom you can see some of the faint doodle markings that I then filled in with the ZIG markers.
All of these pens are waterproof, light fast, acid free and can be set with heat.

This quickly became a project that I found very relaxing and fun and I got to the point where I had to tell myself to stop adding more black doodles and fill in the ones that I had already drawn!!
Once I had filled in the color, I took the Brush PITT marker and outlined all of the doodles. As you can see I doodled on the left sleeve front,

and I added another doodle to the center back. Then I threw the shirt in the drier on the highest setting and today I will go over thew hole piece with a very hot iron.

I think I will wear this shirt to a quilting class that I have on Thursday with Laura Wasilewski, at Artistic Artifacts. Laura is a quilter who adores color so I think this will be appropriate!!

So if you have any scrap booking markers languishing in your art space , take a second look at them and see what you can transform!!! It is amazing what a bit of dye and some color strokes can do to Upcycle a thrift store find!!!!!
Happy Doodling!!!

Saturday, May 21, 2011

Birdies, Berries and Classes!

Before we had all of our rain last week, I noticed a piece of thin plastic waving about in the climbing rose bush. I figured the wind had deposited it there but when I went to pull it down, I found that it had been put there by Mr or Mrs Cardinal!! IT was firmly woven into the structure of the nest that was hidden in the thorny canes of the bush. So smart!!! I did cut out the bit that was flapping in the wind and free from the nest. If it had not been for the plastic tail, I would have never noticed the nest. Now Mrs is getting pretty used to me stopping by for a chat. If you click on the photo and enlarge it you can really see her sitting in on her nest. that orange beak really glows. I love all of the wildlife that makes our yard their home. another benefit of organic gardening. Last week as I planted the tomatoes, I was joined by a large Box Turtle- I shared a few worms with him just to let him know he was welcome any time:).
this is my first year to harvest the Rhubarb and I am thrilled with how my first batch of Strawberry Rhubarb Jam came out.
Yesterday I made a batch of bread and it seems that I have to make another batch tomorrow. Today Matthew ate 3/4 of a loaf of bread as toast, slathered with fresh jam. Strawberry Rhubarb jam is his favorite! I hope that I have enough for another batch!!!! He has been all grins for most of the day!!! YUM!!
Last Saturday I taught my second session of my Collage Jewelry Class. After my first go at teaching this class, I shook things up a bit and the class went much more smoothly! I am starting to have return students and new students who have come to class because they have heard about the classes form their friends! Validation is always so very rewarding!!! Julia did a fabulous job on the necklace that you see above and created a second one as well. Several folks were having trouble with breaking wire till we discovered that they were using pliers with teeth in them, i.e not jewelry grade pliers. Once we changed out the pliers, things went so much more smoothly!!!!
This is Julia's second piece.
this piece was made by a wonderful gal who had a huge collection of her Mom's costume jewelry. We repaired a few pieces and then put a group of them together in this lovely necklace. She was thrilled and so was I !! I love it when students leave classes happy and satisfied!!
Names are flying from my brain at the moment, I hate that, but I love this simple piece with the glorious red sari ribbon! The student wrapped the found stone without any help from me and added a few accent beads. This young gal is a natural!!! I can see a lot more jewelry in her creative future!!
I realized that I never posted the pieces made during my most recent Beaded Cuff class, so here they are.
Meg had some time constraints so she was not able to finish her bead work but she followed our finishing process and will complete her cuff on her own. What she has done was so very pretty and full of personal symbols. I love it when students make their pieces their own!!!
Kathi chose her palette of colors from the sea and did a fabulous job with her hand work!!
Gloria made this stunning Black and Gold creation and was almost done with a second piece!!
Jan used shells and turquoise to conjure thoughts of the ocean for her design. by the time class was over we had most of the beaded cuffs complete and all were excited to be starting on new pieces. They all purchased lots of supplies to keep themselves well stocked!!


I want to leave you with a few shots of my spectacular pink iris from before our week of rain and storms! the delicate blossoms really do not hold up well to rain and they are pretty much done for another year. While they were untouched they were simply stunning and soooo very fragrant!! The roses were not overly happy with the drenching either but at least Belinda's Dream will bloom hard for me all summer. Especially after I give her a banana skin coffee grounds egg shell cocktail to give herr a shot of energy!!!

The Siberian iris are such a stunning sapphire blue, almost purple color and the yellow iris hung in there long enough to give some wonderful contrasting color play in the garden bed. The rose in the background is just coming into her own and is super fragrant.

I hope that where ever you are the flowers are blooming or the leaves are turning to give you the wonderful colors of nature's gifts!!

Tuesday, May 17, 2011

A Special Birthday Card


It is not everyday that one's fabulous and talented and creative Mother turns 80!! SHHHHHH don't tell her that I told you!!
I have had kind of a rough go of things creatively lately and i had to get a birthday package off in time for it to get to Mom on May 16th. ( I just found out that Mom and Madelaine Albright share the same birthday- Well Madelaine is in very good company!!) Anyway , the creative Mojo has been on a slow crawl lately but I needed to get a card thrown together quickly! then I remembered the fabulously lucious cards that my Australian fiber arts friend Suziqu has been creating lately and decided to give some of her techniques a whirl. ( You simply must go by her blog and see her fabulous work!!!)
Now Suzi uses mostly vintage fabrics and gorgeous laces in her work, but I wanted to put my own spin on things, so I used my hand dyed fabrics, a bit of lace, one of my own photos from my garden shots and a metal and glass embellishment. What you see above and below, is what I came up with.

I took the whole pile over to the sewing machine and started to stitch. With flowers come leaves, so leaves it was!


Then I realized that after gluing the piece down onto card stock, I would not have an envelope to fit. Out came the waxed paper and a paper printed pansy photo taken in this years garden and more stitch. Viola! An envie with an image to prolong the suspense of what was inside!
I had so much fun with this card, and the creative juices are definitely recovering to near normal levels!! I must thanks Suzi for her wonderful blog and all of the info that she provides. I must also thank my Mom for all of her support and creative drive that she instilled in me and for the most recent event that inspired me and got the Mojo flowing again!!!
Love You Mom!
Happy Birthday!!

Tuesday, May 10, 2011

Family Fieldtrip and Finding Inspiration

The kids had an excruciatingly late Spring Break from school this year, but once we actually got some time off we embarked on several long put off excursions. Luray Caverns in the Beautiful Shenandoah Mountains of Virginia has been a destination on our list since we moved to Virginia almost 6 years ago. We had some beautiful Spring weather,packed some snacks and took off. It was well worth the two hour drive thru the Dogwood and Red Bud blossomed countryside. So much of Virginia is still forested and wild and so very lovely. It was wonderful to get out and away from the RT 95 corridor to see the natural beauty of our state.
Luray is a massive limestone cave system that has been named one of the most beautiful environments of it's type in the world, by the National Geographic Society. I found it an amazing source of artistic inspiration and incredible beauty . To think that all of these formations were created by slowly dripping water over millions of years, simply astounds the mind. (Have to wonder what the creationists have to say about these wonderful places- denial of existence probably!!)

One of my favorite formations are the Drapperies that hang from the ceiling of the caves and ripple and fold as if created from curtain fabric. This particular formation was back lit and is nicknamed the "Bacon Drape"- this IS Virgina after all, the home of Bacon!!! The folds of the Rock- yes this is rock, remember, were amazingly thin and delicate and hundreds of thousands of years old and still in the process of creation! The desire to reach out of touch the soft flowing folds was strong but not allowed. One easily forgot that what we were looking at was stone.

This cluster of stalagmites reminded me of a Seussian confection collection, resembling ice cream cones or stupendous cupcakes!
I thought this one appeared to be towers of broccoli stems standing one atop another. (Hmmm... seems to be a food theme running here, I must have been hungry!!!)
Here you can get a real sense of the folds in the Drapperies of stone!
I know that I drove Tom and Becca a bit nuts with all of my picture taking but I did manage to get them to stop and slow down a bit to grab a shot of the two of them. I hung back in many spots to take pictures and to try to really SEE what was there.
We all spent quite a bit of time at this spot, marveling at the quiet and stillness. This is called the Lake,although it is only 6 inches deep. It is a totally quiet reflection of stalactites hanging from the ceiling and offers a spectacular illusion of great depth . There is nto aripple nor a movement to disturb the illusion or break the spell- it is truly magical.


In the middle of this pool was a small stalagmite growing thru the surface and I see two figures here, sitting on a rock looking into the water or fishing. on the left I see the elder or larger figure with his left arm encircling the shoulders of the younger to the right. The larger figure holds the fishing pole. (Am I so hungry by this point that I am hallucinating- No , because I can still see it !!)
After about 1.5 hours I was reluctantly drug out of the cave and off to find some lunch. We all left with a renewed awe at the power of a drop of water and the beauty that lies beneath the earth.
As I write this post, the news headlines are full of the news of the power of water drops as they collect to roll down the Big Muddy Mississippi and the aftermath of the devastation wrought by the collection of droplets that became the tsunami in Japan.
The forces of nature and the power, both miniscule, painstakingly slow and overwhelmingly devastating, continue to fill me with awe and inspiration.

Tuesday, May 3, 2011

Learning Something New

I find it so invigorating and exciting to stretch myself and learn a new skill. This Spring, as I have been unable to take advantage of several art retreats, I have been on the lookout for learning new techniques closer to home.
Beads On Parade is a wonderful bead shop in Fredericksburg where I will be teaching my Beaded Cuff class in the near future. Carol, who I have dubbed the Chain Maille Queen, works at the shop and is incredibly generous with her fabulous skills. Carol is a Chain Maille officianado and has designed many of her own patterns. Carol teaches many of the simpler techniques for FREE and displays an amazing array of Chain Maille patterns to entice we novices to plunge in with both feet!!!
About two weeks ago I sat down with Carol, a pile of beads and jump rings and tried my hand at a pattern called Shaggy Loops.
Besides beads and rings, one needs tow good pairs of pliers. My first creation was a pink shaggy loops bracelet for Becca. I used silver and rose gold colored links and two colors of pink beads. I put the entire piece together in about two hours!!! The bracelet is incredibly tactile and fun to wear along with being quite a nice bit of blingy color.
After finishing the bracelet, i went on to make several pairs of Shaggy Loops earrings. I was hooked!!!

For this pair I used wonderful matte finished peacock colored and purple beads and copper links.

Subtle and elegant, don't you think?

For this pair I used some of the fabulously colored rings that Beads on Parade has in stock. The color range is simply amazing and all are available on line!!

I started another set of earrings using the silver links from the bracelet but ran out after creating only one earring. Time to restock!!!!!

Needless to say, I will be spending more time with Carol the Chain Maille Queen to learn some of the more intricate chain maille techniques!!

Now I am off to spread mulch on my gardens before the rain rolls in! have a wonderful day!!

LinkWithin

Related Posts with Thumbnails